Getting Started With An Arduino Nano and a WS2812B Addressable RGB LED Stripe
Posted | Reading time: 4 minutes and 18 seconds.
Almost every journey with Arduino starts with an LED; the Blink example from the Arduino IDE. In this tutorial, the onboard LED of the Arduino is programmed so that it blinks. With most starter kits there also comes a set with LEDs and following the RGB Color Model that opens up an opportunity to give all colors from an 8-bit color palette on an Arduino.
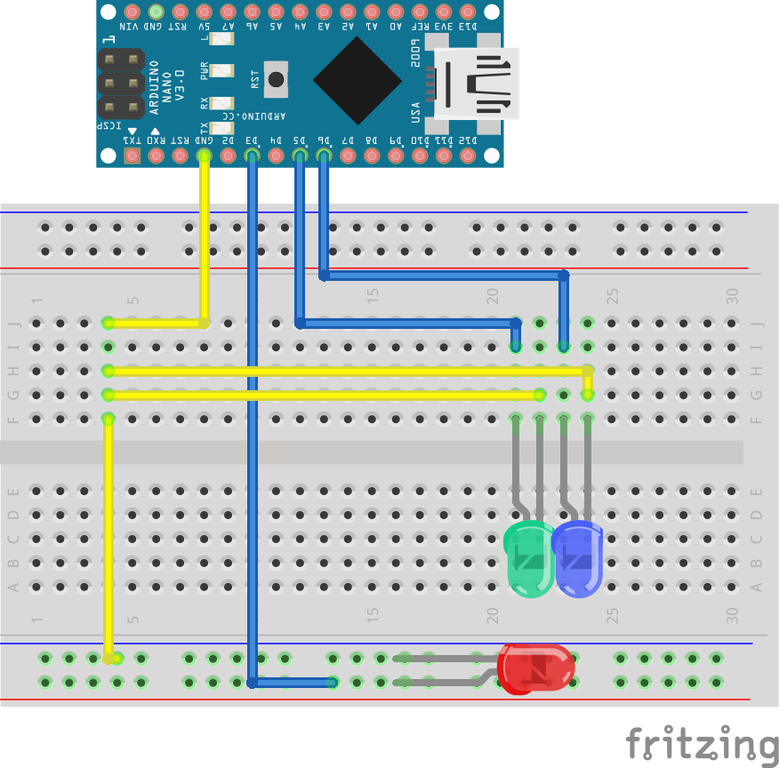
I sketched together a quick example to show you the idea. By putting a red, a green and a blue led right next to each other we can see the basic idea:
Placing a tissue on makes it much more visible how we go from red to green to blue.
The code for this is pretty straightforward, as is the circuit:
// specify the PINs
// NOTE: on most Arduino Boards PVME (analogWrite)
//  works only on pins 3,5,6,9,10,11
const unsigned char LED_RED = 3;
const unsigned char LED_GREEN = 5;
const unsigned char LED_BLUE = 6;

void setup() {
  Serial.begin(9600);
  pinMode(LED_RED, OUTPUT);
  pinMode(LED_GREEN, OUTPUT);
  pinMode(LED_BLUE, OUTPUT);
}

void loop() {
  char leds[] = {LED_RED, LED_GREEN, LED_BLUE};
  int i;
  // Loop through the LEDs
  for(const char &led : leds) {
    // Loop from 0 to 254
    for (i = 0; i < 255; i = i + 1) {
      // write the current value to the led
      analogWrite(led, i);
      delay(10);
    }
  }
  // Fade the LEDs out again
  for(const char &led : leds) {
    for (i = 254; i >= 0; i = i - 1) {
      analogWrite(led, i);
      delay(10);
    }
  }
}

Unfortunately, this specific setup does not scale very well. To control a lot of LED’s you will be required to come up with a way to use only a few pins for a lot of lights. A good way to mitigate this is to use WS28** LED strips.
The WS stands for WorldSemi and is the name of the manufacturer of a set of chips to control LEDs. While those chips are small, they come packed with features. Bringing an internal timer clock, cascading signaling that takes input via a digital interface D0, and passes information to the next element via an output interface (D1), and 3 channel controller for regulating each of the three colors on the TriChip LED.
The cascade is what allows you to control a long strip of LEDs using only one PIN of your Arduino.
So let’s go shopping.
Materials
For this session, I got myself an Arduino Nano clone and an LED strip from China.
| Item | Costs |
|---|---|
| Arduino Nano Clone | 6€ |
| LED Stripe (1m 60 IP67) | 6€ |
| Total | 12€ |
The LEDs can drain up a lot of power; a 5 Meter stripe with 30 pixels per meter needs up to 5V and 9 Ampere. If you get a longer Stripe then 1m be aware that your Arduino will not be powerful enough to provide the juice you need to light the stripe up, but you will have to provide another 5V power supply with appropriate ampere. You can calculate the required ampere with the formula: (60 * <number of LEDs>) / 1000 = required Ampere. For the 5m example we have 150 LEDs, so (60 * 150) / 1000, so 9.
Wiring and code
The strip comes as a long connected band of LEDs. If you would need only parts of them you can cut them at the marked connectors, and solder them.

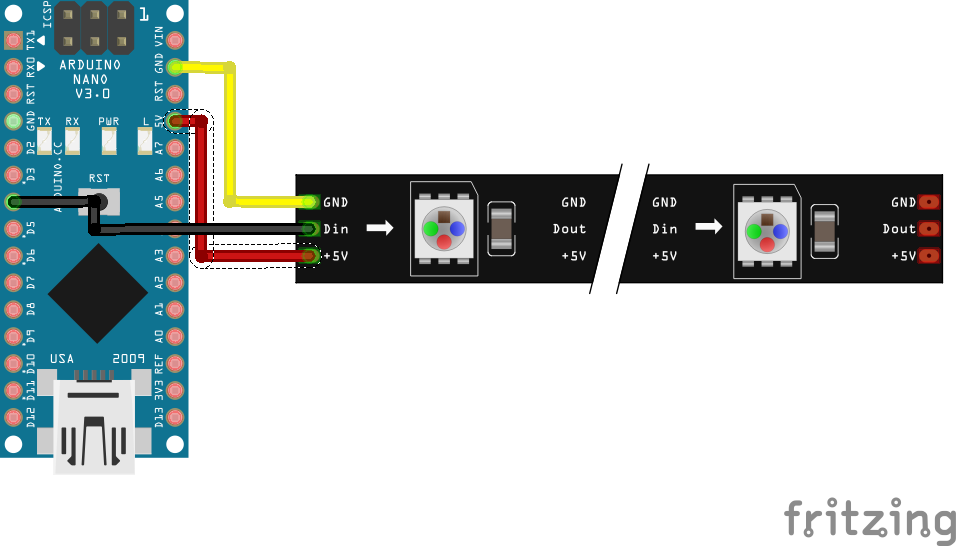
Thanks to the easy setup, wiring up a WS28** Strip is pretty straightforward.

To be able to easily program the strip you can choose from a number of libraries, i.e.:
For my session I used the NeoPixel, mainly because of the examples I found on github.
From the examples, I started to put a series together that starts with a “boot-sequence” in which it shows the 3 RGB colors, then white (all three together), and then a rainbow pattern.
First, we have to include the NeoPixel library
#include <Adafruit_NeoPixel.h>
then we define our pin port, and set up the NeoPixel object for the strip.
#define PIN 4

Adafruit_NeoPixel strip = Adafruit_NeoPixel(60, PIN, NEO_GRB + NEO_KHZ800);
After that we set up the strip with the following lines:
void setup() {
  strip.begin();
  strip.setBrightness(20);
  strip.show(); // Initialise all pixels to 'off'
  delay(30);
}
After that we start the boot sequence with the following commands:
void setup() {
  // previous setup
  colorWipe(strip.Color(255, 0, 0), 10); // Red
  colorWipe(strip.Color(0, 255, 0), 10); // Green
  colorWipe(strip.Color(0, 0, 255), 10); // Blue
  colorWipe(strip.Color(255, 255, 255), 10); // White
  rainbowStart(10);
}
colorWipe is a function that fills the dots one after the other with the color provided. Colors are set via strip.setPixelColor(pixelnumber, color), so the function just iterates over all pixels with a delay of 10ms and sets them to the specified color.
rainbowStart does the same, only not by setting a single color, but one that is incremented from red over green to blue following the color wheel.
Loop does that on a cycle by running a single function:
void loop() {
  rainbowCycle(20);
}
You can find the full source code in this gist: https://gist.github.com/MatthiasKainer/0324ed3bf0aad8319abb4d5ddd1410d9
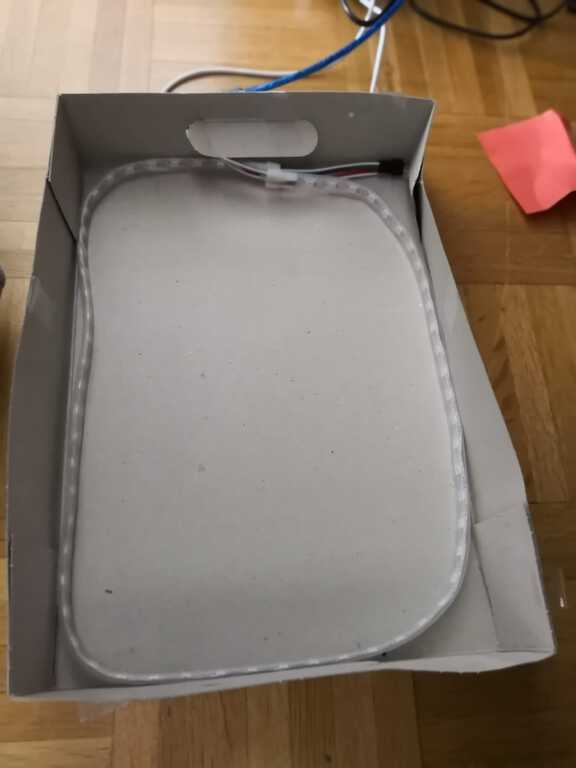
The next task is to find something to illuminate with it. With some cartonage we put together a very simple frame.

As a front for the frame we decided to use the ThoughtWorks logo - I’m working there as a Software Consultant, and so my wife was stiching a ThoughtWorks-branded embroidery design for me.
Voila, a nice frame to put up the wall. While my wife wanted to invest some more time in the stiching, I’ll add a motion sensor to it so it will only light up when someone is walking by.